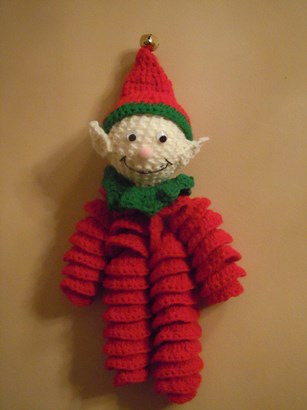
Christmas clown elves
01:45
Since everyone is already excited about
Christmas, here's my ornamental contribution (much too early, really)
to the craze and kindness. Not sure what this is, clown or elf or
gnome... found this little thing on the flea market years ago, so I
had to have a go at mass-producing it back then.

Definitely worth a revision... I hope!
:) Good for decorating trees or adding soul to places. And although
my recent research (a simple search for “crochet clown”) has
shown that there are many free patterns available online for such...
elves (http://www.craftelf.com/Christmas/Crochet%20elf.JPG
– this is great) and clowns
(http://www.knitting-crochet.com/found/clopat.html),
not one is exactly like this fellow. So here he is.

SIZE: Approximately 15 cm from top of
hat to toe, without the hanging loop.
MATERIAL/HOOK: I used a 3 mm hook with
light fingering yarn.
SKILL: easy – and fast, about 90
minutes to complete!
LEGS
R1: ch 41, 3 sc in second chain from
hook, 4 sc in each chain (160 sc)
R2: change color (mine was the green
and red for this one), turn and sc in each of the 160 sc you made, sl
st for last stitch, finish off
Note: It will already curl up by
itself, although you will need to shape both the legs and arms a bit
by pulling and squeezing and making sure the layers slide on each
other nicely. The resulting look has to show the wrong side of your
work, so twist in that direction.
ARMS
R1: ch 29, 3 sc in second chain from
hook, 4 sc in each chain (112 sc)
R2: change color (mine was the green
and red for this one as well), turn and sc in each of the 112 sc you
made, sl st for last stitch, finish off
COLLAR
R1: ch 12, sl st to first ch to form
circle
R2: ch 3 (stands for the first dc), dc
in same stitch, 2 dc in each stitch around (24 dc)
R3: change color, ch 3 (stands for the
first dc), dc in same stitch, 2 dc in each stitch around (48 dc)
HAT
No need to sl st at the end of each
round.
R1: ch 1 and 3 sc into magic circle
R2: 2 sc in each stitch (6 sc)
R3: sc in each stitch (6 sc)
R4: inc, sc in each stitch (7 sc)
R5: sc in each stitch (7 sc)
R6: inc, sc in each stitch (8 sc)
R7: sc in each stitch (8 sc)
R8: inc, sc in next 3 stitches, inc, sc
in remaining 3 stitches (10 sc)
R9: sc in each stitch (10 sc)
R10: inc, sc in next 4 stitches, inc,
sc in remaining 4 stitches (12 sc)
R11: sc in each stitch (12 sc)
Change color
R12: *2 sc in next stitch, 1 sc in next
stitch* around (18 sc)
R13: sc in each stitch (18sc)
R14: sc2tog around so that there are 9
sc's, sl st, finish off
For the hanging loop, ch 30, finish
off, fold and tie a knot at the end, then pull through the very top
of the hat with your hook.
HEAD
You can use a cloth with filling, a
crochet sphere, a small ball, anything you prefer, provided it fits
the hat. Once you're done with the head, pull the hat onto it, it
should be tight and unforgiving, but that's the point.
My not-so-round ball of a head was made
as follows. I'm sure you'll find loads of better patterns for free,
but hey, at least the size worked with this one!
R1: ch 1 and 6 sc in magic circle
R2: *sc
1, 2 sc in next stitch* around (9 sc)
R3: *sc in next 2
stitches, 2 sc in next stitch* around (12 sc)
R4: *sc in next 3
stitches, 2 sc in next stitch* around (15 sc)
R5: sc in each
stitch around (15 sc)
R6: *sc in next 3
stitches, sc2tog* around (12 sc)
R7: *sc in next 2
stitches, sc2tog* around (9 sc)
Add stuffing.
R8: *sc 1, sc2tog*
around (6 sc)
Slip stitch,
finish off, pull yarn through all 6 sc's, tighten.
Insert into hat
with the R8- side inwards, R1- side facing outwards.
Sew arms and legs
together at their center, fold the collar neatly over them and sew
for stability, then sew the head onto the little hole at the top of
the collar.

I'm no good with faces, so I ventured a
blank. Get creative with buttons, smiles, eyes and rosy cheeks,
please!


0 comments